Oyster shucking is a practice that dates back centuries, with its origins rooted in the coastal regions of the world. The act of shucking an oyster involves opening the shell to reveal the succulent meat inside, and it has been a culinary tradition in many cultures for generations. The history of oyster shucking can be traced back to ancient times, when coastal communities relied on the bountiful harvest of oysters as a source of sustenance. In fact, evidence of oyster consumption has been found in archaeological sites dating back thousands of years, indicating that this practice has been a part of human culture for a very long time.
In the early days, oysters were often consumed raw, as they were plentiful and easily accessible along the coastlines. As the practice of oyster shucking evolved, so did the tools used to open the shells. In ancient times, people used whatever sharp object they had on hand, such as a stone or a sharp stick, to pry open the oyster shells. Over time, specialized oyster knives and butter knives were developed to make the process easier and safer. Today, oyster shucking has become a popular culinary art form, with competitions and festivals dedicated to the skill of opening oysters quickly and efficiently.
Choosing the Right Oyster and Butter Knife
When it comes to shucking oysters, choosing the right oyster and butter knife is essential for a successful and enjoyable experience. Oysters come in a variety of shapes and sizes, and it’s important to select ones that are fresh and healthy. Look for oysters that are tightly closed and have a clean, briny smell. Avoid oysters that are open or have a strong, unpleasant odor, as these may be signs of spoilage.
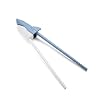
In addition to choosing the right oysters, having the proper tools is crucial for shucking success. A good quality oyster knife or butter knife is essential for safely and effectively opening the shells. Look for a knife with a sturdy, sharp blade and a comfortable handle that provides a good grip. There are many different styles of oyster knives available, so it’s important to choose one that feels comfortable and secure in your hand. Some knives have a pointed tip for piercing the hinge of the oyster shell, while others have a wider blade for prying open the shell. Whichever style you choose, make sure it is well-made and suited to your individual needs.
Preparing the Oyster for Shucking
Before you begin shucking your oysters, it’s important to properly prepare them for the process. Start by rinsing the oysters under cold water to remove any dirt or debris from the shells. Use a stiff brush to scrub the shells clean, paying special attention to the hinge area where the two halves of the shell meet. This will help ensure that the shells open easily and cleanly when you begin shucking.
Once the oysters are clean, it’s time to secure them for shucking. Hold the oyster firmly in one hand, using a clean kitchen towel or glove to protect your hand from any sharp edges on the shell. Position the oyster with the hinge facing towards you, as this is where you will insert the knife to open the shell. With the oyster securely in place, you’re ready to begin shucking.
The Technique for Opening an Oyster with a Butter Knife
Opening an oyster with a butter knife requires skill and precision, but with practice, it can become second nature. To begin, hold the oyster firmly in one hand with the hinge facing towards you. Insert the tip of the butter knife into the hinge of the oyster shell, using gentle pressure to wiggle it back and forth until you feel it start to give. Once you’ve created a small opening in the hinge, carefully slide the knife along the edge of the shell to separate the two halves.
As you work your way around the shell, be mindful of any sharp edges or protrusions that could cause injury. Take your time and use steady, controlled movements to avoid damaging the delicate meat inside. Once you’ve loosened the shell all the way around, carefully pry it open with the knife, being mindful of any liquid inside that may spill out. With a little practice and patience, you’ll soon be able to open oysters with ease using just a butter knife.
Tips for Avoiding Injury
Shucking oysters can be a rewarding and enjoyable experience, but it’s important to take precautions to avoid injury. When working with sharp knives and delicate shells, there is always a risk of cuts or puncture wounds if proper care is not taken. To minimize this risk, it’s important to use the right tools and techniques for shucking oysters safely.
One important tip for avoiding injury is to always use a clean, sharp knife when shucking oysters. Dull knives can slip or catch on the shell, increasing the risk of accidents. Additionally, make sure to keep your fingers and hands clear of the blade at all times, using a kitchen towel or glove to protect your hand while holding the oyster. It’s also important to work on a stable surface and maintain good posture while shucking, as this will help prevent accidents and strain on your body.
Serving and Enjoying the Freshly Shucked Oyster
Once you’ve successfully shucked your oysters, it’s time to enjoy the fruits of your labor. Freshly shucked oysters can be served in a variety of ways, depending on your personal preferences and tastes. Some people enjoy their oysters plain, savoring the briny flavor and delicate texture of the meat on its own. Others prefer to dress their oysters with a squeeze of lemon juice, a dash of hot sauce, or a dollop of cocktail sauce for added flavor.
No matter how you choose to serve your freshly shucked oysters, it’s important to savor each bite and appreciate the unique qualities of this delicious seafood delicacy. Oysters are often enjoyed as an appetizer or as part of a seafood platter, and they pair well with a variety of wines and other beverages. Whether you’re enjoying them at home or at a restaurant, take your time to savor each oyster and appreciate the skill and effort that went into shucking them.
Cleaning and Maintaining Your Butter Knife
After you’ve finished shucking your oysters, it’s important to properly clean and maintain your butter knife to ensure its longevity and performance. Start by rinsing the knife under warm water to remove any debris or residue from the blade and handle. Use a mild dish soap and a soft sponge or cloth to gently scrub away any stubborn stains or buildup.
Once the knife is clean, dry it thoroughly with a clean towel to prevent rust or corrosion from forming on the blade. Store your butter knife in a dry, well-ventilated area to prevent moisture from accumulating and causing damage over time. If your knife has a wooden handle, consider applying a small amount of mineral oil periodically to keep it hydrated and prevent cracking or warping.
By taking good care of your butter knife, you can ensure that it remains in top condition for many years of successful oyster shucking. With proper maintenance and regular cleaning, your butter knife will continue to be a valuable tool for opening delicious fresh oysters for years to come.


KitchenAid 5 Ultra Power Speed Hand Mixer – KHM512, Ice Blue


Genuine Fred SHARK Munchtime Chopsticks, One Size, Multicolor
$7.99